cumuloid
A port of the Mutable Instruments Clouds granular audio processor to the Electro-Smith Daisy Petal guitar pedal platform.
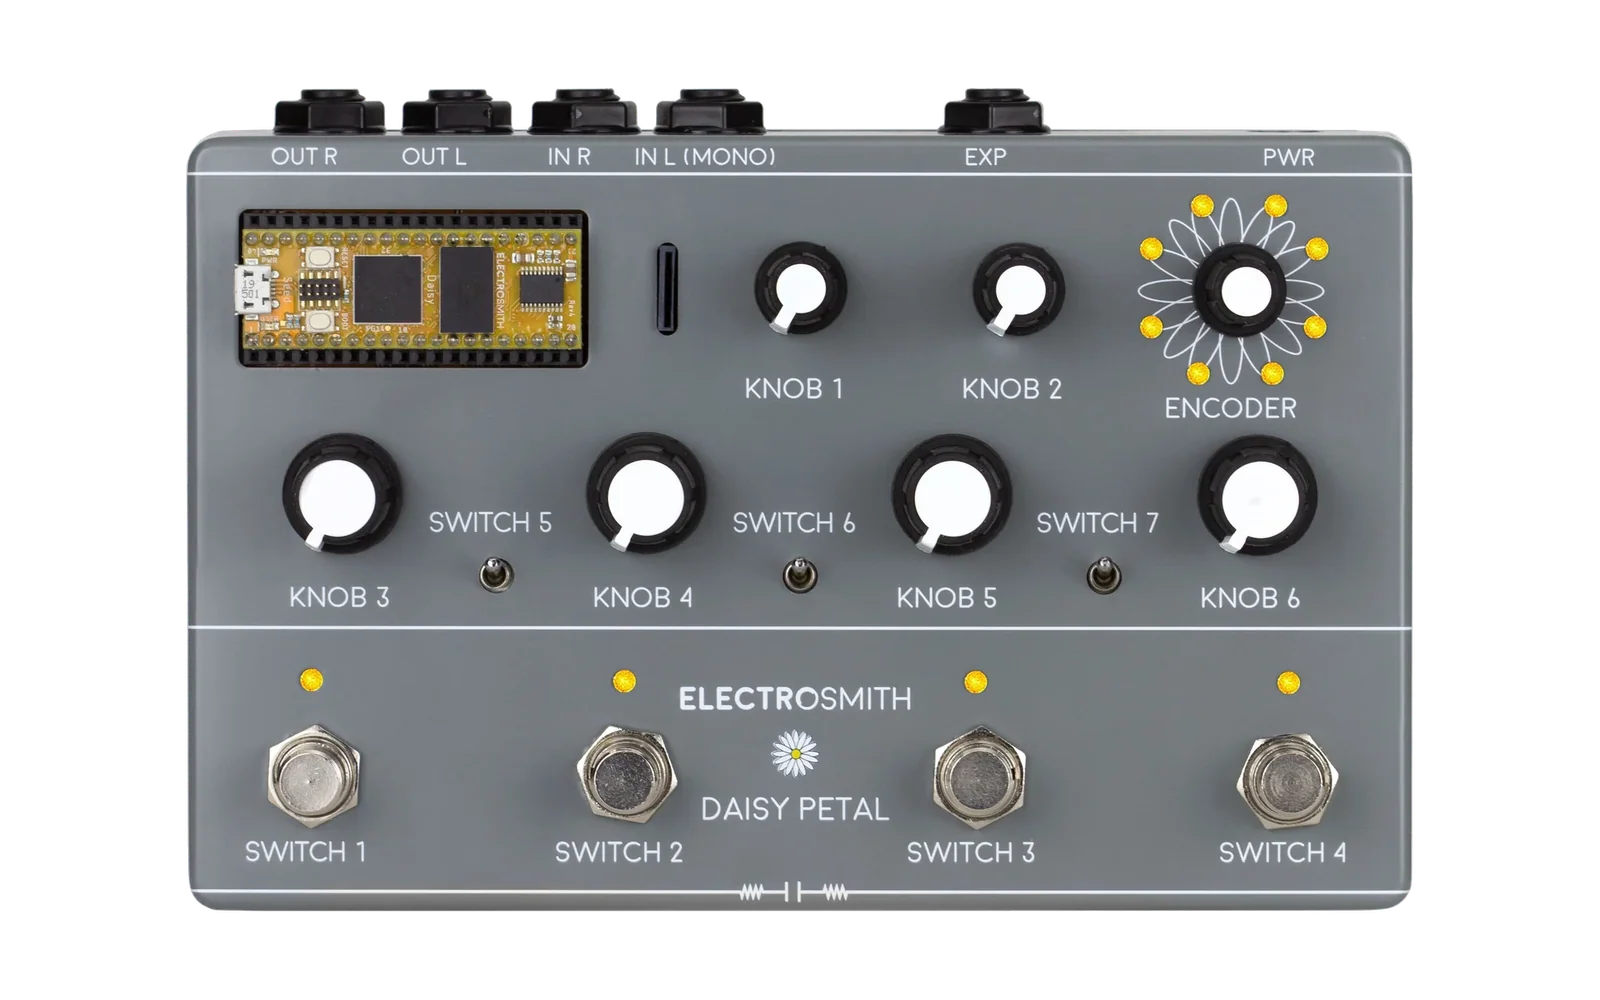
Clouds is a legendary granular synthesizer/processor originally designed for Eurorack modular synthesizers by Émilie Gillet. This port brings the full Clouds DSP engine to the Daisy Petal, a guitar pedal platform built around the STM32H750 microcontroller. Because the Petal doesn't have CV in, and the control structure is different, certain stylistic decisions have to be made.
Known issues
- Cyan (Stretch) mode — wet signal is currently silent. Dry signal is audible but affected by the DSP. Under active investigation. See GitHub Issues for details.
Controls
Knobs
| Knob | Function |
|---|---|
| K1 | Position — where in the buffer grains are read from |
| K2 | Size — grain length (also set by tap tempo) |
| K3 | Texture — grain envelope shape |
| K4 | Density — how many grains per second |
| K5 | Pitch — grain playback pitch (cubic curve, noon = unity) |
| K6 | Blend — dry/wet mix |
Note on Density: At noon, no grains are generated. Turn clockwise for random grain timing, counterclockwise for regular/constant timing. Keep above or below noon for sound output.
Note on Pitch: Pitch shift affects perceived volume — higher pitch = louder output. This is normal Clouds behavior.
Encoder
| Action | Function |
|---|---|
| Turn | Cycle through processing modes |
| Hold | Shift mode — enables secondary knob functions (see below) |
Shift mode (hold encoder)
While holding the encoder, knobs control secondary parameters. The ring LEDs dim to 30% to indicate shift mode is active. Knobs use catch behavior — a knob only takes effect once it physically passes its previously set value, preventing jumps.
| Knob | Secondary Function |
|---|---|
| K1 | Reverb amount |
| K2 | Feedback amount |
| K3 | Low pass filter cutoff (1kHz–12kHz, wet signal only) |
| K4 | High pass filter cutoff (40Hz–400Hz, wet signal only) |
| K5 | Dry signal level |
| K6 | Overall output level |
Footswitches
| Switch | Function | LED |
|---|---|---|
| S1 | Freeze — hold current buffer, grains recirculate | Lit when frozen |
| S2 | Quality — cycle through 4 audio quality settings | Dims each step |
| S3 | Bypass — true 1:1 bypass | Lit when effect is engaged |
| S4 | Tap tempo — sets grain size from tap interval | Blinks at tapped rate |
Hold S4 for 1 second to clear tap tempo and return grain size to K2.
Quality settings (S2 cycles through):
- 16-bit stereo (full quality) — LED full brightness
- 16-bit mono — LED at 66%
- 8-bit stereo — LED at 33%
- 8-bit mono lo-fi (µ-law, Cassette/Fairlight character) — LED dim
Microswitches
| Switch | Up | Down |
|---|---|---|
| S5 | Unassigned (reserved) | Unassigned |
| S6 | Randomize grain positions | Locked/deterministic grains |
| S7 | Pitch snaps to musical intervals | Smooth continuous pitch |
Pitch snap intervals (S7 up): -2 oct, -1 oct, -5th, unison, +5th, +1 oct, +2 oct
Ring LEDs
| Color | Mode | Notes |
|---|---|---|
| Amber | Granular | Classic granular synthesis |
| Cyan | Stretch | Time stretching via WSOLA (wet signal issue — see known issues) |
| Green | Looping | Looping delay with granular control |
| Purple | Spectral | FFT-based phase vocoder |
- Blue tint on the active mode LED = freeze is active
- Dimmed to 30% = shift mode is held
Setting up from scratch
What you need
- Electro-Smith Daisy Petal
- Mac or PC
- USB cable (data cable, not charge-only)
- Visual Studio Code
- Basic working knowldegde of the terminal/command line
Step 1 — Install VS Code
- Download and install VS Code
Step 2 — Install the ARM toolchain
This is the compiler that turns C++ code into firmware for the Daisy.
Mac:
brew install --cask gcc-arm-embedded
If you don't have Homebrew: brew.sh
Verify it worked:
arm-none-eabi-gcc --version
You should see something like arm-none-eabi-gcc 10.3.1
Step 3 — Install dfu-util (for flashing)
Mac:
brew install dfu-util
Step 4 — Set up the Daisy libraries
Create a folder for your Daisy projects and clone the required libraries:
mkdir ~/Documents/Daisy
cd ~/Documents/Daisy

git clone https://github.com/electro-smith/DaisyExamples.git
cd DaisyExamples
git submodule update --init --recursive
Build the libraries (this takes a few minutes):
cd libDaisy && make && cd ..
cd DaisySP && make && cd ..
Step 5 — Clone cumuloid
cd ~/Documents/Daisy
mkdir Projects
cd Projects
git clone https://github.com/hfl1967/cumuloid.git
cd cumuloid
Step 6 — Get the Mutable Instruments source files
cumuloid uses the original Clouds DSP engine from the Mutable Instruments eurorack repository. These files are not included in this repo (to respect the original license structure) and must be fetched separately.
cd ~/Documents/Daisy
git clone https://github.com/pichenettes/eurorack.git
cd eurorack
git submodule update --init --recursive
Then copy the required files into cumuloid:
EURORACK=~/Documents/Daisy/eurorack
PROJECT=~/Documents/Daisy/Projects/cumuloid

# Clouds DSP
cp $EURORACK/clouds/dsp/*.h $PROJECT/dsp/
cp $EURORACK/clouds/dsp/*.cc $PROJECT/dsp/
cp $EURORACK/clouds/dsp/fx/*.h $PROJECT/dsp/fx/
cp $EURORACK/clouds/dsp/pvoc/*.h $PROJECT/dsp/pvoc/
cp $EURORACK/clouds/dsp/pvoc/*.cc $PROJECT/dsp/pvoc/

# Resources
cp $EURORACK/clouds/resources.h $PROJECT/
cp $EURORACK/clouds/resources.cc $PROJECT/resources.cpp

# stmlib
cp $EURORACK/stmlib/stmlib.h $PROJECT/stmlib/
cp $EURORACK/stmlib/dsp/*.h $PROJECT/stmlib/dsp/
cp $EURORACK/stmlib/dsp/units.cc $PROJECT/stmlib/dsp/units.cpp
cp $EURORACK/stmlib/dsp/atan.cc $PROJECT/stmlib/dsp/atan.cpp
cp $EURORACK/stmlib/utils/*.h $PROJECT/stmlib/utils/
cp $EURORACK/stmlib/utils/random.cc $PROJECT/stmlib/utils/random.cpp
cp $EURORACK/stmlib/fft/* $PROJECT/stmlib/fft/
Fix the include path in resources.cpp:
cd $PROJECT
sed -i '' 's|#include "clouds/resources.h"|#include "resources.h"|g' resources.cpp
Rename .cc files to .cpp (required by the Daisy build system):
for f in dsp/*.cc dsp/pvoc/*.cc; do mv "$f" "${f%.cc}.cpp"; done
Step 7 — Build
Open VS Code, then File → Open Folder and navigate to your cumuloid folder.
Open a terminal in VS Code (Terminal → New Terminal) and run:
make
A successful build ends with memory usage like this:
FLASH:       0 GB    128 KB    0.00%
QSPIFLASH:  ~167 KB  7936 KB   ~2%
Warnings about unused-local-typedefs from stmlib are normal and harmless.
Step 8 — Install the Daisy bootloader (one time only)
The Daisy needs a special bootloader installed once before it can receive firmware via USB. This only needs to be done once.
Put the Daisy in factory DFU mode:
- Hold the BOOT button on the Daisy Seed (the small button on the module itself)
- While holding BOOT, press and release RESET
- Release BOOT
Flash the bootloader:
dfu-util -a 0 -s 0x08000000:leave \
  -D ../../DaisyExamples/libDaisy/core/dsy_bootloader_v6_2-intdfu-2000ms.bin \
  -d ,0483:df11
A successful flash ends with File downloaded successfully.
Step 9 — Flash cumuloid
Put the Daisy in bootloader mode: Double-tap the RESET button quickly. The LEDs will blink briefly to confirm.
Flash:
make program-dfu
A successful flash ends with:
Download done.
File downloaded successfully
Transitioning to dfuMANIFEST state
The pedal reboots automatically. You should see the amber ring LED light up indicating Granular mode.
Troubleshooting
"No DFU capable USB device available"
The bootloader window is short. Try running make program-dfu first, then immediately double-tap RESET while it's waiting. Or try a different USB cable — some cables are power-only and won't work for flashing.
The double-tap isn't working Try the BOOT+RESET method instead: hold BOOT, press/release RESET, release BOOT. Note this enters the factory bootloader (not the Daisy bootloader) and can only be used to reflash the bootloader itself, not cumuloid.
No sound
- Make sure S3 LED is lit (effect engaged, not bypassed)
- Turn K4 (Density) away from noon in Granular mode — at noon no grains are generated
- Turn K6 (Blend) clockwise for more wet signal
Project structure
cumuloid/
├── cumuloid.cpp          # Main file — all hardware control + audio callback
├── Makefile              # Build config
├── resources.cpp/h       # Clouds lookup tables
├── clouds -> .           # Symlink needed for include paths
├── dsp/                  # Clouds DSP engine (from eurorack repo)
│   ├── granular_processor.cpp/h
│   ├── parameters.h
│   ├── fx/
│   └── pvoc/
└── stmlib/               # stmlib support library (from eurorack repo)
    ├── dsp/
    ├── fft/
    └── utils/
Technical notes
Memory layout: The Daisy Seed has 128KB internal flash, 64MB SDRAM, and 8MB QSPI flash. cumuloid uses APP_TYPE = BOOT_QSPI — the entire program lives in QSPI flash, leaving internal flash for the bootloader. Grain buffers (182KB) live in SDRAM.
Sample rate: The Daisy runs at 32kHz to match Clouds' internal DSP rate. All Clouds timing calculations assume 32kHz.
Single translation unit build: All Clouds DSP sources are #included directly into cumuloid.cpp. This sidesteps Daisy build system limitations with subdirectory .cpp files and allows the compiler to optimize across all DSP code in one pass.
Include path: The clouds -> . symlink in the project root allows the Clouds DSP source files to resolve their own #include "clouds/dsp/..." paths correctly after being moved out of the eurorack repository structure.
Credits
The granular DSP engine is the work of Émilie Gillet (Mutable Instruments). See CREDITS.md for full attribution.
The Daisy platform is the work of Electro-Smith.
License
See LICENSE.md. The cumuloid port is released under MIT license to match the upstream Mutable Instruments license.