🪴 Audrey II Touch
Audrey II is a horrorscape synthesizer used by film composers, sound designers and composers.
🪴 Audrey II Touch Faceplate
Order the faceplate only:
➡️ Audrey II Touch Faceplate
Or get the full Simple Touch package, including all faceplates — Audrey, Bass, String, FX, and Blank:
🎛️ Order Simple Touch
QUICK INSTALL
Download the Binary file and flash using the Daisy Seed web programmer
Manual
Audrey Touch excites a feedback loop to create drifting horrorscapes, and can also be driven by external audio to work as an effect on drum loops, melodies, or voice.
Have a look at the flow chart embedded into the faceplate design to understand how parts interact.
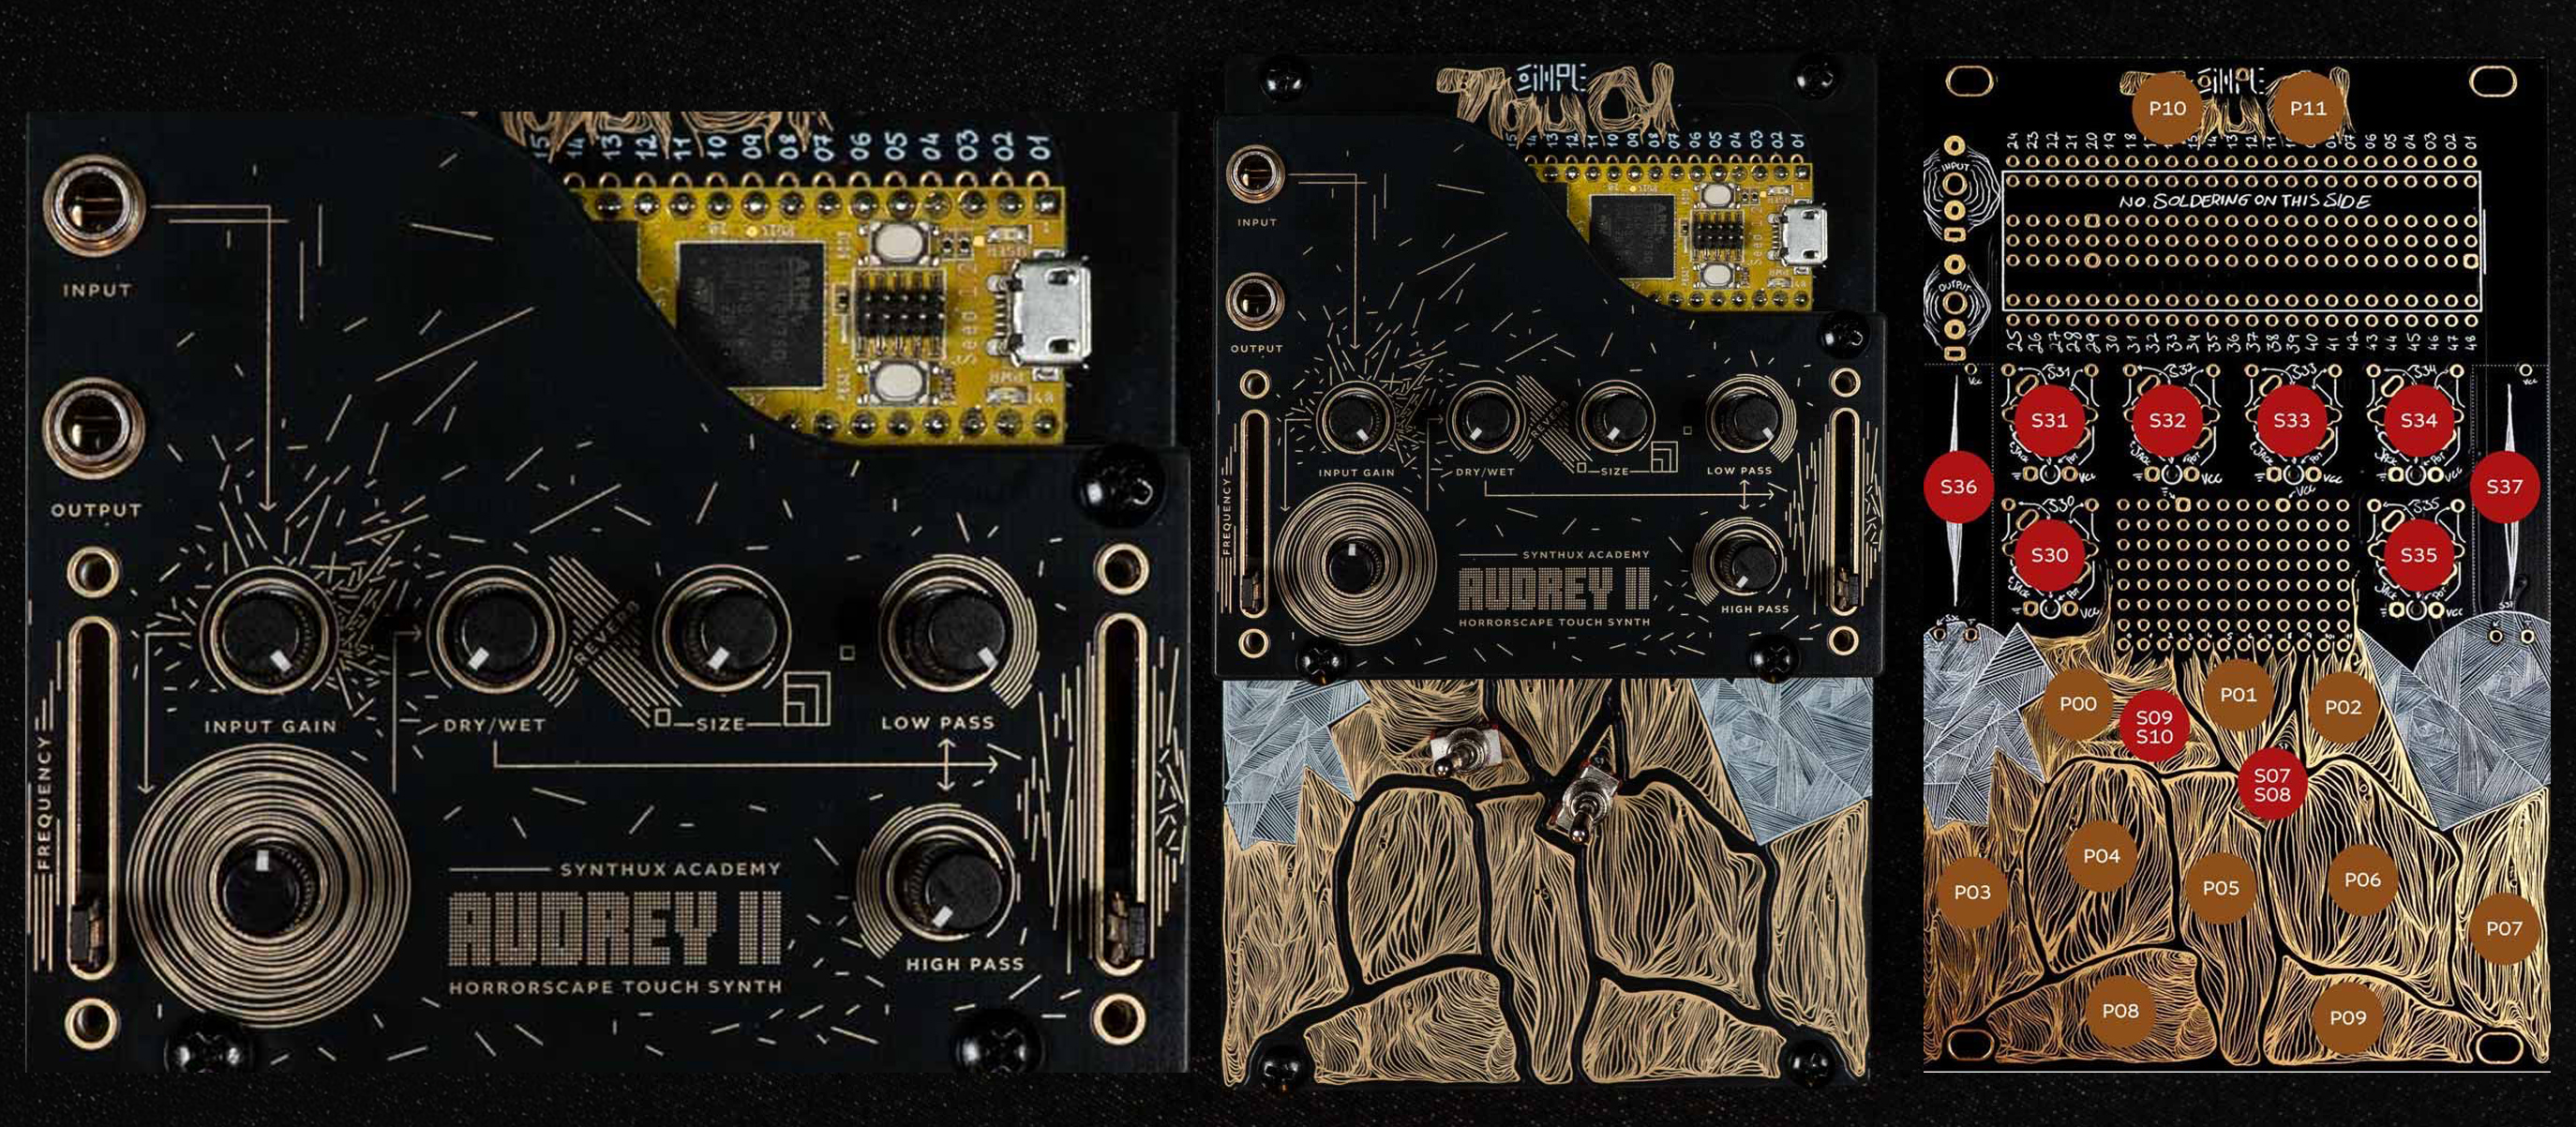
For background on the instrument, how it differs from Audrey II, the full MIDI CC map, and a step-by-step workflow, see manual.md.
Controls
Note: always be careful with volume levels. The controls offer a wide range of possibilities, and fine-tuning and experimentation are key to finding sweet spots. Different inputs will produce different results, so it is always a good idea to start with the minimum pot positions (CCW) and slowly bring up S30, the excitation amount, and S31, the input gain.
Audio In: Only the left channel is used from the stereo line input. Audio Out: stereo line out
Knobs:
- S30 - Main control, use this to set a trigger threshold
- S31 - Input gain, turn down to disable and only use internal exciter (hold P10 to instead control output volume)
- S32 - Dry / Wet, how much does the sound disintegrate
- S33 - Size, space out the reverb
- S34 - Low Pass, use in conjunction with high pass to narrow down the range
- S35 - High Pass
- S37 (right fader) - filter mix (hold P11 to instead control envelope shape)
- S36 (left fader) - frequency
Pads
Frequency:
- P03 - P09 - tap to excite different frequencies
- P00 - tap for octave down
- P02 - tap for octave up
Scale:
- P11 + P00 - Hold P11 and tap P00 to cycle through the three pad scales
Drone:
- P11 + P02 - Hold P11 and tap P02 to toggle drone
Envelope:
- P11 + S37 - Hold P11 and move the right fader to change the envelope (same envelope as Touch Bass)
Output volume:
- P10 + S31 - Hold P10 and turn S31 to control output volume instead of input gain
Switches:
- The left switch is currently unused and free. It used to change pad scales, but that's now done via the P11 + P00 pad combo instead (see Scale under Pads above).
- The right switch controls modulation over the right fader. Keep it down for no modulation (direct body control); the other two positions both drive a randomized sample-and-hold-style modulator (not a literal sine wave) at different rates. See manual.md for how this works.
MIDI Implementation
Receives on all channels, understands NoteOn/Off and CCs:
- 7 - Output volume
- 12 - Reverb decay
- 70 - Frequency
- 72 - Envelope shape
- 74 - LP filter cutoff
- 75 - Feedback gain
- 76 - Feedback body
- 77 - Input volume
- 81 - HP filter cutoff
- 91 - Reverb mix
See manual.md for how these CCs map onto the knobs/faders above, including which ones aren't a 1:1 match and the pad-hold combos not printed on the faceplate.
Installing Audrey II Firmware on Simple Touch
- Download the latest .bin file from the repository releases section.
- Hold down BOOT and then press RESET, then release both buttons. This will put the Daisy into BOOT MODE (you can tell you did it right if the top LED stops flashing).
- Upload the firmware via the web flash tool.
- Or build the firmware yourself using the instructions below
Building the Audrey Touch firmware
1. Setup
- Follow the Daisy Developer Setup Guide to install the required toolchain (ARM GCC, Make, etc.).
- Clone this repository
- Install the submodules via
git submodule update --init --recursive
cd lib/DaisySP/
make
cd ../libDaisy/
make
2. Build
make clean ; make;
The resulting .bin file will appear in the build/ directory.
3. Flash
- To flash directly from your computer (via USB DFU mode):
make program-dfu
- OR use the web flash tool